Qualityoflife86
Member
My sterilization process for used media bottles or new ones.
I do not reuse vials.
However I could, I just find the cleaning process of trying to get old oil out very tedious.
1. Clean all glassware in sink with hot water and lots of quality dish sop. WHY? U want all the old oils completely cleaned off and anything else. Sunlight is great for this.
-Use quality bottle brush with foam end, and clean dish cloth for outside of bottle cleaning. WHY? Bristles will not do a good job, you need a sponge and lots of soap to remove oils from the inside of bottles.
2. Rinse very well.
At this point u could choose to place everything in zip lock bags to finish the sterilization process later. If items have lids, put them on and toss in zip lock bags. WHY? Maybe ur in a rush or wish to sterilize later...
Or continue on.
Time to put on medical gloves. I use medical gloves starting now until the end. I go through a lot.
3. Fill large bowl with highest consideration isopropyl alcohol. 91% or better. Wallmart
4. fill another 2 large bowls with distilled water. This will be for your rinsing phase.
5. Begin rinsing all glassware through isopropyl alcohol . If u can cover the top, shake well. Dump out and fill again and shake well again. I also let it soak in the ISO for a short time before agitating it.
6. After Iso rinse, place in first bowl of Distilled water. Rinse well. Don’t let to much ISO get into ur 1st Distilled bowl. You will notice the water looks slimy due to the ISO, give it a few swishes and then place into the 2nd Distilled bath.
NOTE:
Depending on how much you are sterilizing, you may want to toss the 1st bowl and make ur 2nd bowl your 1st distilled wash station and fill another new bowl with fresh distilled water, making a new 2nd distilled rinse station.
7. Rinse well in 2nd bowl of distilled water. Once you move from the ISO to distilled water you will NOT use regular water to rinse. Only clean distilled water in a clean bowl. You should notice that the water on the glassware looks normal now.
8. Place glass into autoclave or, as I use, a large pressure cooker. I set the pressure cooker to steam for 45 to 60 minutes.
9. once finished in the pressure cooker, let cool.
10. Pull biostatic glassware out of pressure cooker and immediately cover all openings with clean tinfoil.
11. Heat oven to 500 degrees Fahrenheit.
12. Poke holes in the tops of tin foil when you are ready to go into oven. WHY? U want the moisture to escape, but don't want any dirt or particles getting into ur glass.
13. make sure your glassware is biostatic glassware. Place in oven for one hour.
NOTE!
DO NOT PUT ANYTHING THAT HAD isopropyl alcohol in it, into your oven, you will blow up ur oven or house... you’ve been warned. It must be rinsed well first.
14. pull out, let cool and inspect. Make sure it looks clean and free of any moisture, oil, dirt or dust.
15. This is the magic, if your not using the glass right away, use a food saver thing to vacuum seal everything for future use. If u get the lids on your bottles at the right temperature, you can create a vacuum seal due to the temperature lowering and air cooling. I still vacuum seal my bottles even when I have a lid on them.
END
I also do this with vials. 7
Ill have the rubber stoppers pre sterilized using the same process minus the oven heat.
As soon as the vials are cooled enough to grab I’ll slap on the rubber stopper and vacuum seal all of the vials with the rubber stopper on them.
Sterilization process of butyl rubber stopper, plastic lids and magnetic stirrer’s.
Follow steps 1 through 9.
- 10 - After you let it cool from the pressure cooker. Toss it all into some tin foil and loosely wrap it up. Not to tight as you want moisture to escape but u don't want contaminants to float in.
- 11 - Toss in air fryer at 100F to 150F MAX, for an hour or until everything is completely dry. If ur unsure, toss in to another 30 minutes.
Rubber stoppers can handle somewhere up to 250F but the plastic lids that screw on to ur biostatic glassware are only good up to 150F I use the air fryer because my oven gets to hot at the lowest setting and melts plastic.
Supplies.
biostatic glassware WHY? it’s meant to handle extreme heat, like 500C to 800 C or 932F to 1472F. Enough heat to kill anything that's left and dry your glass. WHY do I need to dry? Any moisture can fuck with your gear and make it look funky.
Quality dish soap
large clean bowls
Oven that can hit 500F
isopropyl alcohol 91% or better.
Pressure cooker or autoclave.
Tin Foil
Quality bottle brush with some sort of sponge on the end.
Distilled Water.
medical gloves
I have gotten good at multitasking and can have everything sterilized and vacuum sealed in a few hours. But once its done and vacuum sealed, you can leave it be and focus on the brew when u decide to start that process. Having backup sterilized clean glassware is really handy when shit goes south and u need it on hand right away.
Set yourself up for success, just like meal planning, meal timing and everything else you should be doing, this is no exception.
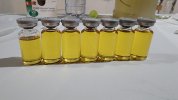
 some finished TrenE, a test batch
I do not reuse vials.
However I could, I just find the cleaning process of trying to get old oil out very tedious.
1. Clean all glassware in sink with hot water and lots of quality dish sop. WHY? U want all the old oils completely cleaned off and anything else. Sunlight is great for this.
-Use quality bottle brush with foam end, and clean dish cloth for outside of bottle cleaning. WHY? Bristles will not do a good job, you need a sponge and lots of soap to remove oils from the inside of bottles.
2. Rinse very well.
At this point u could choose to place everything in zip lock bags to finish the sterilization process later. If items have lids, put them on and toss in zip lock bags. WHY? Maybe ur in a rush or wish to sterilize later...
Or continue on.
Time to put on medical gloves. I use medical gloves starting now until the end. I go through a lot.
3. Fill large bowl with highest consideration isopropyl alcohol. 91% or better. Wallmart
4. fill another 2 large bowls with distilled water. This will be for your rinsing phase.
5. Begin rinsing all glassware through isopropyl alcohol . If u can cover the top, shake well. Dump out and fill again and shake well again. I also let it soak in the ISO for a short time before agitating it.
6. After Iso rinse, place in first bowl of Distilled water. Rinse well. Don’t let to much ISO get into ur 1st Distilled bowl. You will notice the water looks slimy due to the ISO, give it a few swishes and then place into the 2nd Distilled bath.
NOTE:
Depending on how much you are sterilizing, you may want to toss the 1st bowl and make ur 2nd bowl your 1st distilled wash station and fill another new bowl with fresh distilled water, making a new 2nd distilled rinse station.
7. Rinse well in 2nd bowl of distilled water. Once you move from the ISO to distilled water you will NOT use regular water to rinse. Only clean distilled water in a clean bowl. You should notice that the water on the glassware looks normal now.
8. Place glass into autoclave or, as I use, a large pressure cooker. I set the pressure cooker to steam for 45 to 60 minutes.
9. once finished in the pressure cooker, let cool.
10. Pull biostatic glassware out of pressure cooker and immediately cover all openings with clean tinfoil.
11. Heat oven to 500 degrees Fahrenheit.
12. Poke holes in the tops of tin foil when you are ready to go into oven. WHY? U want the moisture to escape, but don't want any dirt or particles getting into ur glass.
13. make sure your glassware is biostatic glassware. Place in oven for one hour.
NOTE!
DO NOT PUT ANYTHING THAT HAD isopropyl alcohol in it, into your oven, you will blow up ur oven or house... you’ve been warned. It must be rinsed well first.
14. pull out, let cool and inspect. Make sure it looks clean and free of any moisture, oil, dirt or dust.
15. This is the magic, if your not using the glass right away, use a food saver thing to vacuum seal everything for future use. If u get the lids on your bottles at the right temperature, you can create a vacuum seal due to the temperature lowering and air cooling. I still vacuum seal my bottles even when I have a lid on them.
END
I also do this with vials. 7
Ill have the rubber stoppers pre sterilized using the same process minus the oven heat.
As soon as the vials are cooled enough to grab I’ll slap on the rubber stopper and vacuum seal all of the vials with the rubber stopper on them.
Sterilization process of butyl rubber stopper, plastic lids and magnetic stirrer’s.
Follow steps 1 through 9.
- 10 - After you let it cool from the pressure cooker. Toss it all into some tin foil and loosely wrap it up. Not to tight as you want moisture to escape but u don't want contaminants to float in.
- 11 - Toss in air fryer at 100F to 150F MAX, for an hour or until everything is completely dry. If ur unsure, toss in to another 30 minutes.
Rubber stoppers can handle somewhere up to 250F but the plastic lids that screw on to ur biostatic glassware are only good up to 150F I use the air fryer because my oven gets to hot at the lowest setting and melts plastic.
Supplies.
biostatic glassware WHY? it’s meant to handle extreme heat, like 500C to 800 C or 932F to 1472F. Enough heat to kill anything that's left and dry your glass. WHY do I need to dry? Any moisture can fuck with your gear and make it look funky.
Quality dish soap
large clean bowls
Oven that can hit 500F
isopropyl alcohol 91% or better.
Pressure cooker or autoclave.
Tin Foil
Quality bottle brush with some sort of sponge on the end.
Distilled Water.
medical gloves
I have gotten good at multitasking and can have everything sterilized and vacuum sealed in a few hours. But once its done and vacuum sealed, you can leave it be and focus on the brew when u decide to start that process. Having backup sterilized clean glassware is really handy when shit goes south and u need it on hand right away.
Set yourself up for success, just like meal planning, meal timing and everything else you should be doing, this is no exception.
 some finished TrenE, a test batch

